The start of 2013 has been the definition of unpredictable and unexpected in our house. With the temperature dropping we have gotten to put the new radiant heat system to the test. (I am planning on doing a post just about the radiant heat sometime soon to explain a little more about it, but I did put some info on it HERE). Our goal with the radiant heat is to improve the energy efficiency of our house - something that can be hard to do with older houses. We knew that another step we would need to take in order to improve the efficiency of the house was to add more insulation in the attic. For our house we should have had about 15 inches of insulation in our attic, and we only had about 5 inches.
Long story short:
- not enough insulation
- no more forced air furnace to dry out air
- extra moisture from the new concrete slab in the basement as it cures
- heat getting up into attic
- extra moisture in attic
- mold growing in attic (yikes!)
SO
We have spent our year thus far taking everything out of the attic, add insulation, get rid of all the cardboard boxes (which were soggy from the moisture) and put everything into plastic totes (which are on sale right now at pretty much every store - yay!)
I'm not going to show you any pictures - because it is a complete and total mess! But we are slowly getting everything cleaned up, and things should be getting back to normal soon.
Hope the start of your new year has been less messy than ours has been!

Showing posts with label Home Improvement. Show all posts
Showing posts with label Home Improvement. Show all posts
Sunday, January 6, 2013
Tuesday, July 31, 2012
Adventures in Home Improvement: Basement Wall Footers
We have been hard at work in the basement ~ thus the lack of posting!
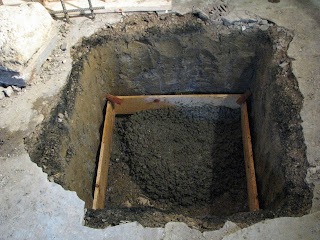
Since the footers for the columns are poured, next we move to the footers for the walls. Since we are digging down below the existing wall and footer in the basement we have to pour new footers and walls down to meet them. We can only dig 4 foot sections at a time ~ because we are digging under the existing wall any more than 4 feet and we would risk the wall caving in. So we have the walls marked off in 4 foot sections and we started digging! Sorry these are not very pretty pictures...it's hard to make dirt look pretty!

After we dig the section, rebar is pounded into the clay on either side and connected to run all the way across the new wall/footer. Wood forms keep the concrete in place until it hardens. Each footer/wall section is made in 3 parts.

(This is where my laundry room will be!)
Each section has 2 metal straps curved into hooks on the bottom that stick down into the concrete footer and are bolted to the upper part of the wall to connect the new wall and footer to the existing wall.

We are working on finishing up footers #6,7, and 8 (of 34!)
and starting to dig #9.
This will be the most time consuming part of
but will be worth it in the end!
Thursday, July 5, 2012
Adventures in Home Improvement: How To Pour A Footer
This post is a bit off the normal topic for this blog, however in an effort to detail our Operation: Finish Basement project, today we are going to show you how to pour a concrete footer. **Disclaimer: Please keep in mind that we are in no way professional contractors. More like ultimate DIYers who have done a lot of research and reading about basement renovation, and a family member who is an expert on concrete.
As you may (or may not) remember from {THIS POST} we have our holes dug for the new footers for the new support columns for the basement. We built frames for the new footers out of pine 1X10s and anchored them into the clay with some metal spikes and wood to make sure frame doesn't shift during the pouring process.
Now that the holes are all ready for their concrete footers, we started Step #3 - Mixing and pouring the concrete for the new footers!


 And then sit back and let it dry.
If you are taking on a project like this, and would like more details about the process, please feel free to contact us with your questions.
As you may (or may not) remember from {THIS POST} we have our holes dug for the new footers for the new support columns for the basement. We built frames for the new footers out of pine 1X10s and anchored them into the clay with some metal spikes and wood to make sure frame doesn't shift during the pouring process.
Now that the holes are all ready for their concrete footers, we started Step #3 - Mixing and pouring the concrete for the new footers!

(Yes, we have a concrete mixer. It's on a trailer and it is very handy!)

Begin by mixing the powder cement (we used type 1 portland cement), sand, 3/4 inch crushed line stone, and water to make the concrete. We used a 1-2-3 ratio for the concrete. (Leave a comment if you would like to know more about concrete mixing ratios)

Once the concrete is mixed well, dump it into a wheelbarrow and now you need to get it inside. The best way for us was to go through the window...

My job was to shovel the concrete into the shoot and then push it down to the wheelbarrow waiting below. FYI ~ Concrete is HEAVY! I couldn't even push the full wheelbarrow - good thing Daniel is strong!

Daniel made this shoot out of a B-900 water pipe cut in half, and it works perfect!

Shovel into the shoot, and push it down to wheelbarrow #2 waiting below.

Next, dump the concrete into the hole

Repeat until the frame is filled to the top with concrete.
One step that I didn't get a picture of was the rebar lattice that is incased in the concrete.
Rebar is the steal bars that make the concrete stronger - you may have seen them when driving past a road construction project.

Smooth out the concrete

If you are taking on a project like this, and would like more details about the process, please feel free to contact us with your questions.
Saturday, June 23, 2012
Adventures in Home Improvement: Operation Finish Basement
Well, we have been working towards this day for a while now...
One of our 2012 Home Improvement Goals is to finish our basement.
Step 1 was to get rid of everything in the basement. Done.
Today we started Step 2: Removing old support columns and digging holes to pour new footings for new support columns.

Yep, this is our basement floor.
If you have ever wondered what's under your house...most likely it's clay. Very compacted, hard to break apart, super strong clay. Well...at least that is what is under our house. One of my jobs was to break apart the thin top layer of concrete with a hammer. I kind of felt like the Hulk. Daniel kept saying "Veronica Smash!"
Well, we haven't found any buried treasure yet.
But there is still lots of digging left to do!
If you are in the Chicago area and like to dig holes and smash things, stop on over!
What are you doing this weekend?
Monday, June 18, 2012
Adventures in Home Improvement: Flower Planter
This is what the front of our house looked like almost 3 years ago when we purchased it...

After lots of work
new roof
new stucco
new windows & door
paint
and some landscaping
There was still one thing missing...

Daniel did the measuring, cutting, gluing, nail gunning...
And I held things for him...

And I took pictures!

And handed him things too!

Basically he started with 3 long pieces of pine. The were much to long, so he cut about 2 feet off of each piece (to be later used for the ends and insides). The bottom and back boards were glued and nailed at a 90 degree angle, but the front board was cut so it lay more at a 120ish degree angle. He measured and cut the end pieces and nailed it all together.


Then he put some support boards inside, dividing the planter into thirds.
The supports do not go all the way to the top, so once the dirt is in, they will not be visible.

We painted it (and I forgot to take pictures of that), placed it on the 2 posts sticking out of the house and filled it with dirt and flowers!

We planted petunias, vinca vine, dahlias, and a dwarf purple cone flower.

(Like how I just left the front door open to run outside and take the picture!)
The front of the house finally looks complete!
Linking up with Beneath My Heart's "Best DIY Projects of June" party!
Linking up with Beneath My Heart's "Best DIY Projects of June" party!
Wednesday, May 30, 2012
Adventures in Home Improvement: House Goals Update
In January I told you about some goals we have for our house this year.
To read all of them you can
Well we have been hard at work and here is a bit of an update!
Our BIG project is finishing the basement.
Not only finishing, but digging it deeper and pouring a new footing.
But the first step of that is to clean it out!
Here is the picture from January

I know, YIKES!
But after lots of sorting, organizing, throwing out, and moving to the garage,
we are getting closer...

Next project:
Since last year I have had strips of frog tape on the dining room wall...

For some shelved that Daniel made for me.
This weekend they got put on the wall!!


Now I just have to gather some items to display on my shelves!
Next Topic:
Remember when I told you about the VoxBox I got in the mail {here} that was filled with great products for me to try for FREE...
Well, I have been trying out all the products and tomorrow will be starting to tell you about them!
Up first will be the Sally Hansen Salon Effects nail polish strips.
Ohh! One more thing....

Check it out!
Also, Isn't this the cutest button ever! I love it.
Thursday, January 26, 2012
Adventures in Home Improvement: Gathering Ideas
One of our home improvement goals for 2012 is to finish our basement (yeah, I know, super big goal!). Since we are starting with a blank canvas of a basement, I have been gathering ideas like crazy. It is fun dreaming of things we can do with the space...


Speaking of bathroom, we are stumped on something and I thought I would ask your advice! Our house has one full bath now, and we will be adding a 2nd one in the basement. Our dilemma: Do we put in just a shower or a combo tub and shower in the new basement bathroom. We do have a tub in the main bathroom. Do we need 2 bathtubs in the house? Thoughts?
Wednesday, January 11, 2012
Adventures in Home Improvement: Home Goals for 2012
As I was browsing around blog land the other day, I came across a post by The Nester that I thought was so perfect for me! She is hosting a party today for posts about "Home Improvement Goals for 2012". Writing down goals always makes me think much more about them, and really makes them real. When I was swimming in college I would always write down my goal times and tape them to the wall right next to my bed so I keep those goal times in mind all the time...It helped me to keep focused on the end goal. So I am going to give this goal writing a try with our home improvement goals (but this time I am not going to print these off and tape them to the wall in my bedroom).
Finish paint in kitchen ~ As you can see, there are some spots we just didn't get to with the paint. Most people don't even notice, and most days it doesn't bother me, but it will be nice when it is done.


Put up shelves in dining room ~ Daniel built these beautiful shelves on my request, but we never actually hung them...


organize office ~ This is the extra room in our house and has kind of become a catch all for items that don't have a home. I use it for tutoring, crafting, sewing and it is a guest room for the occasional guest. It is in serious need of a clean out and reorganize.

Big Goals:
Finish basement ~ This goal will most likely take more than just one year to complete, but we want to start working on it this summer. I guess the first step to achieving this goal is to clear all the junk/tools out of the basement!
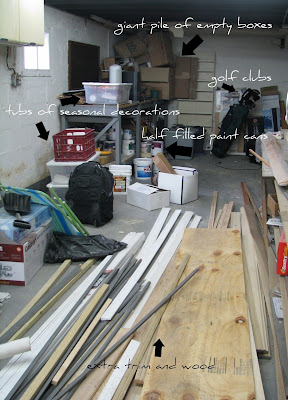

This is only a small part of the basement, but the other parts are so yucky that I couldn't bring myself to take pictures of them! Once they are all cleaned out, I will take some "before" pictures.
So there you have it, our home improvement goals for 2012!
Do you have any home improvement goals for this year?
Subscribe to:
Posts (Atom)