Image Map
Showing posts with label Crafts. Show all posts

Wednesday, May 15, 2013

Adventures in Crafts: Personalized Wedding Gift

Even though I don't get to participate in the "Handmade Gift" round of So You Think You're Crafty, I still had a great project all ready to go, and I wanted to show you!! 

With wedding shower season in full swing and wedding season right around the corner, I decided to make a handmade gift that is useful and special for all brides and grooms!
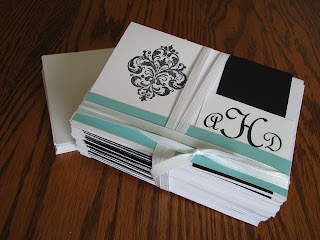
Handmade Personalized Wedding Stationary
Making personalized cards is one of my most favorite things to do. And personalized stationary when you are just starting off with a new name is such a special and exciting gift! I used the colors on and style on invitation for inspiration on the design of the cards. Daniel's cousin Andrew married a wonderfully beautiful bride (Debbie). So the "H" is their last initial. A for Andrew, and D for Debbie.  
Personalized Monogramed Thank You Cards
If the bride likes the color teal enough to include the color on her wedding invitation, it's a safe bet she will love to receive this set of cards! I made 50 of them, and tied them up with a bow. Perfect shower gift, or wedding gift!
Personalized Monogramed Wedding Thank You Cards

Do you have a favorite Handmade Gift that you have received?
Or given? 
I would love to hear about it!! 


Friday, May 3, 2013

Adventures in Crafts: Knight In Shining Duct Tape Armor

Wow, that was a close round!!!
So You Think You're Crafty Round 6 ~ Duct Tape
Could you guess which duct tape project was mine??


I was really stumped on what to make for this round!
But my project ended up getting 2nd place this round! Yay! 
Thanks to everyone who voted! 

I know making things out of duct tape is all the rage now, but I am a regular silver duct tape kind of gal. I wanted to make something that made sense to make it out of duct tape....not just make it because I can. 
 Real armor is much to heavy for a young knight, so what looks like armor with out being so very heavy...Duct Tape Armor!
This turned in to a much larger project than I thought it would be
(Funny how that happens, right?!)
The armor I made includes: helmet, shield, sword, breast plate, back plate, shoulder guards & arm guards (also called vambrace and besagues in knight lingo). The breast plate fits over the knights head, wraps all the way around the torso, and is secured in the back by velcro straps. For protection from enemies on all sides! The arm guards and shield are fit with elastic bands to secure them in place. 
I constructed the entire costume using duct tape, string, velcro, some cardboard and a sheet of aluminum foil. 5 rolls of duct tape later, a few young knights have a fun, new costume to use when slaying dragons! 
Since the velcro is adjustable, this armor can fit different knights of different age and size. 
My fabulous models are a family from our church! Thanks boys!! 

Next week's theme is 
Outdoor/Yard

If you were going to make an outdoor craft, what would it be?

Friday, April 26, 2013

Adventures in Crafts: Chalkboard Craft Shelf

Thanks everyone who voted on this week's round of So You Think You're Crafty!
Could you guess which project was mine?!
It was the Chalkboard Craft Shelf!
(Which came in 2nd place! Eek!)
I am LOOOOOVING my upcycled shelf.

I had my eye on this little shelf since we purchased our house almost 4 years ago. It was all alone on the basement wall, collecting dust. Last year when we started Operation Finish Basement, I rescued it from going into the dumpster. I have always wanted a shelf to keep all of my small crafting items on, all together in one place, rather than tucked away in random boxes and places. And I have been wanting to try chalkboard paint on a project... So here is my upcycled Chalkboard Craft Shelf!
Each of the shelves has a little lip on it that I painted with chalkboard paint. The shelves are labeled with chalk and if I need to relocate and item or add a new area, I just erase the chalk and re-write the label! I am a huge fan of labeling and this chalkboard paint just makes it so easy!!
I also repurposed some empty (and washed) tin cans, jars, and bottoms of cardboard boxes to hold some of my craft items. I also dressed the top of the shelf up by adding the hand made letters "CRAFT" and the little pin wheels. My favorite addition to the shelves it the ribbon shelf! I installed the dowel  held up by 2 pieces of 2X4's, so that I can just roll off how much ribbon I want!

Next week's theme is
Duct Tape!

Linking up with Thrifty Decor Chick's May Before and After party!

Saturday, April 20, 2013

Adventures in Crafts: Awesome Alien Robots

I just squeaked passed round 4 of So You Think You're Crafty!
Did you guess which project was mine?! 
It was:

Last weeks project was tricky because I wanted to think of a FUN project for kids, that was still crafty, but easy enough for kids to do on their own....it's no fun for a kid to watch a grown up do 75% of the craft. And while I think all of the projects submitted last week were great, I do not think all of them would be fun and do-able for kids (but that's just me...and I don't have kids yet...so maybe I'm wrong...)

But no worries here, because my Awesome Alien Robots got enough votes to make it to the next round!

The crafts that I remember having the most fun with as a kid, where the ones where I got to use my imagination. So with that in mind, I raided my recycle bin and "odds and ends" craft drawer, and put my imagination to work! These alien robots are fun, inexpensive, and are only limited by the creator's imagination. Anything goes with this "kids can do" craft! 
Meet Pink Eye, Camo, and Bob. 

Round 5 is "Upcycle or Repurpose" 
And I LOVE my entry for this round
(I can't tell you which one it is!)
I am totally thrilled with how it turned out! 
Voting starts on Monday! 

Monday, April 15, 2013

Adventures in Crafts: SYTYC Round 4

Friends, I am thrilled to report that I have made it to Round 4 on

(eeek!!)

This week's theme is 
"Kid's Can Do"
Meaning all the crafts are things that are fun and creative and kid friendly!
So if you are looking for a kid friendly craft to try our with your kids or grandkids,
click {HERE} to check out the entries and please vote for your favorite. 
If you don't have kids, but would like to check out the great ideas for kids crafts and to vote,
click {HERE}
(Don't worry, you don't have to pick one or the other, both links go to the same place!) 

If you missed it, here are my entries in the previous 3 rounds
Round 1 ~ Spring "Grow With Me" Dress

Round 2 ~ Knock Off Bel-Air Bedding

Round 3 ~ The Game of Memory 


Friday, April 12, 2013

Adventures in Crafts: The Game of Memory ~ Scrap Style!

I survived to craft another week at So You Think You're Crafty! 
Thanks to everyone who went over to vote!

Did you guess which Scraptastic craft was mine?! 

It was The Game of Memory ~ Scrap Style!


How I made the game pieces:

Gathering the most fun fabric scraps I could find, I cut 48 squares of fun fabric scraps to make 48 Memory squares.


 I backed each scrap with a white quare and then decided to make a white frame on the fun fabric side so that there was no color showing when the squares were flipped face down...so there was no sneaky peeking going on during the game! 

So each tile has 4 pieces of fabric sewn together 
Starting from the bottom:
(1) Solid white square
(2) Slightly smaller grey square 
(3) Colorful fabric *Make sure ever square has a match!
(4) White "frame" square - same size as the bottom square, just with the middle cut out. 
 Pin the layers together in the correct order and zig-zag stitch around the inside opening to hold the colorful fabric tile in place. Then I used a serger to finish the outside edges, but a zig-zag stitch could also be used to finish the edges.
I whipped up this little travel bag out of a scrap as well to keep all the pieces together! 
We had a fitted sheet that was worn out in the middle, but the fabric on the edges was fine. So I cut off a corner, replaced the elastic with a string, sewed up the other 2 sides and ta-da! 
The Game of Memory ~ Scrap Style! Anyone want to play?!


Friday, April 5, 2013

Adventures in Crafts: Bel-Air Knock-Off Bedding

Round 2 of So You Think You're Crafty is done! Did you guess which project was mine?! 

It was the...
Can I just say that making a duvet cover is no easy task...It seemed much easier in my head than it turned out to be in real life! The style of duvet cover we both fell in love with was the Barclay Butera Interiors Bel Air duvet cover. If you click over to their site you will see that the duvet covers and pillows cost well over $500! So, off I went to the fabric store in search of material to make my knock-off. When I was shopping I found a patterned fabric I loved, and decided to make a reversible duvet cover.
Bel Air style on one side, fun "hydrangea" pattern on the other side. The hardest part was the planning (geometry refresher anyone?!) and cutting of the Bel Air style side. I sewed in snaps on the top edge and bottom flap to help keep the comforter in place. I also made 3 pillows to go with the duvet cover. 2 white with grey borders (kind of flip-flopped from the mint with white boarders in the Bel-Air bedding). And my favorite detail, the square pillow with the hydrangea flower hand sewn on the front. 


Have you ever tried to take a picture of a big thing (like a bed) in a small room?! It's not easy! Sometime in the next few weeks I will post details about how I made the duvet cover and the different pillows! 

Next week's theme is "Scraptastic"... What would you make with scraps around your house? 

Monday, March 25, 2013

Adventures in Crafts: Round 1 Starts Today

Round 1 of So You Think You're Crafty season 15 starts today!
Remember a few weeks ago when I asked you to vote 
for your favorite "Audition" project and my Love Nail Art made it to the Top 10?!

Well, TODAY the real competition starts!
For (hopefully!) the next 9 weeks.

Every week there is a theme.
The crafters submit a craft that goes with the theme.
(This week's theme is SPRING)
You rank the crafts in order from your MOST favorite to your LEAST favorite.
The lowest ranking craft/crafter gets 'sent home' at the end of the week.
And everyone else survives to craft in the next round!

So, could you please do something for me?!
Click {HERE}, check out the SPRING crafts, and vote!

Friday, March 8, 2013

Adventures in Crafts: Love Nail Art


LOVE NAIL ART
 Many times the inspiration for my crafts come from memories I have from my childhood and special times with my family. That is exactly how I came up with this Love Nail Art project! I remember one of my favorite pictures at my great-grandmother's house that was made with pins and bright string on a black felt canvas. Mesmerizing and very 70's retro! I wanted to make something similar but I added a little bit of a country home spin to it. 
Using a 5 X 12 inch piece of wood, denim, nails, string and a hammer, I outlined the letters LOVE with the nails on the denim covered wood. It took a while (and 2 smashed fingers!) to pound the nails in just right. Once the nails were secure I used a double strand of embroidery floss to weave between the nails. This part was done by trial and error. If I didn't like how the letter was looking, I would just un-weave the string and start again.   
Once I was happy with how the letters looked, I outlined them with a single strand of black embroidery floss to give them a little more definition and pop. I had a frame in my stash from the clearance section of Hobby Lobby that was perfect for this. The frame by itself looked good, but I thought it just needed a bit more. So I used some of the leftover denim to make some accent flowers. I haven't found the perfect place to hang this Love Nail Art project yet, so for now I have it on a little stand.