Image Map
Showing posts with label Sewing. Show all posts

Wednesday, April 10, 2013

Adventures in Sewing: Hydrangea Accent Pillow

My favorite part of the Knock-Off Bel-Air Bedding is the Hydrangea Accent Pillow in the center.
And it was really the easiest part of the whole project!
Here is how I made it!
First, I cut a bunch of '4 leaf clover' shapes from white cotton fabric,
and 2 squares of the grey fabric (20 inches X 20 inches).
Taking one white piece at a time, using needle and thread, go threw the center of the shape, and then around in a circle. Pull the thread tight and stitch to the center of one of the grey squares. 

I used an embroidery hoop as a guide for the circle shape of the hydrangea. 

It took about 50 white pieces to fill in the circle.
 Stitching it by had took a while, but I am really happy with how it turned out! 


Linking up with TDC

Monday, April 1, 2013

Adventures in Sewing: Grow With Me Spring Play Dress

Did you vote last week on Round 1 of So You Think You're Crafty? If you did, thank you!
I got enough votes to make it into round 2 which starts today! 

Round 1's theme was "Spring" and I had been wanting to make a dress for my sweet little niece Amber. This was the perfect excuse! (Did you guess the "Grow With Me" Dress was my entry?!) I have to be honest, even though I love this little dress, I loved some of the other entries more - these ladies can craft!!! 

Most little girls I know love to play dress up. However like the weeds in a spring garden, little girls grow out of clothes seemingly overnight! To try to make the most of a new dress-up dress, I wanted to try to make a dress that would "grow" with the growing little girls, and this is what I came up with The "Grow With Me" Spring Play Dress.

This dress can 'grow' in 3 different spots. (1) The straps have 2 sets of snaps so they can be made longer or shorter. (2) The ties on the sides can be tied in the back at whatever length is comfortable around the waist.


And my favorite way this dress can grow is (3) Under each little flower is a snap that when attached holds up the hem of the skirt, and when un-snapped, gives the dress an extra two inches of length. Pretty and Practical!
So, do you know of any little ladies who like to play dress up and grow faster than the spring weeds who could love this dress?


Round 2 starts TODAY and the theme is "Knock-Off"
And I am so excited about my project I could just burst! 
Click HERE to vote in round 2.

Friday, November 2, 2012

Adventures in Sewing: Boxes and Buttons

I have mentioned before that my Grandma Nona was an amazing seamstress. I had mentioned {HERE} that she would make a special dress for me each year for my birthday when I was growing up. I found a picture of one of the dresses the other day was doing some cleaning and organizing. Here is me with my doll (her name was Lindsey) in our matching dresses made special for us by my Grandma Nona.
I'm pretty sure she made us matching hair bows as well! 
Anyway, I wanted to share with you something else I found when I was cleaning and organizing. I have been working on using and organizing some of the sewing supplies that I inharited when my Grandma passed away. I have been having a blast making projects for me like my Jewelry Travel Pouch, and projects for other people like the Bell Dress for Olivia and the dress for Kate Mae, all using the supplies from my Grandma's sewing stash. Some of the boxes contain items that I assume are for some type of sewing project, but I have no clue what they are for! 
Take this box for example:
Inside were a collection of 4 different pieces...
There were tons of these
And tons of these...
And then I saw this round, cardboard pattern. It has the word button on it, and that is when it clicked. These are pieces to make your own covered buttons (well, I think that is what they are anyway!) So I stared messing around with the pieces and here is what I got...


Taadaa! A pretty, covered button! So fun!
I've been thinking of projects I can use these with...
I could use these to make flowers like this
                                                                    Source: tatertotsandjello.blogspot.com via Makenzie on Pinterest
                                 
                                      Or on something like this
                                  
                                                                                             Source: bhg.com via Barb on Pinterest


                    Have you ever used these "make your own covered buttons" for a project? Happy Friday! 

Monday, October 15, 2012

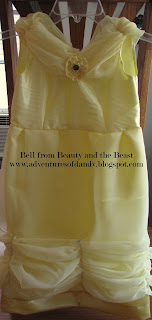
Adventures in Sewing: Bell From Beauty and the Beast

My Grandma Nona was a seamstress. An AMAZING seamstress. When I was little, for my birthday she would make me the most beautiful dress-up dresses. Not just one for me, but a matching one for my doll as well. When she passed away I inherited a (jackpot) bunch of fabric and any sewing supply that you can imagine. I have been slowly using these special supplies for different projects. When my sister-in-law Olivia saw the fabric, right away she zeroed in on the bunch of different fabrics all in the same yellow color. Almost the same yellow as a certain Disney princess. 
And when she asked me if I could make her a yellow Bell dress from Beauty and the Beast, I knew my Grandmother would love to have that fabric made into a special dress for a special little girl. This week was Olivia's 5th birthday and I got her Bell dress done just in time! 


My favorite part of this dress are these little buttons I found in a box of odds and ends from my Grandma. They reminded me of the enchanted rose from the movie! 
Happy Birthday to the cutest Bell around! 
Linking up with Becoming Martha

Thursday, August 16, 2012

Adventures in Sewing: Jewelry Travel Pouch

I have not gotten to do very much sewing this summer (mostly because of Operation: Finish Basement) but I had this idea in my head and I just had to try it. What do you put your jewelry in when you travel? Truth time: I usually use a ziplock sandwich bag. Yep. Not the best mode of transportation for my pretty things. So I decided to make a little pouch for my jewelry. One of my girlfriends has something similar and I have always thought it was such a great idea. Even if you are a beginner sewer you can make this project. All you need to be able to do is cut circles and sew in a straight line (well around a circle, but it is really not hard, promise!) 
Step 1: Pick your fabric. These two colors called to me from my stash of fabric from my grandmother. 
Step 2: Make 2 circle templates. I used a dinner plate for the large one (10 1/2 inch diameter) and a small mixing bowl for the small one (5 1/2 diameter). 
Step 3: Cut 2 large circles and 2 small circles. 
Step 4: Take the 2 small circles and sew them together (right sides together) make sure to leave a small opening to turn them right side back out. Stitch opening closed after turning right side out. 
Step 5: Make another small circle using a stronger fabric - I used a scrap of grey felt I had. Cut it slightly smaller than your template (so it is the same size of your 2 smalls circled sewn together). 
Step 6: Find the center of the felt circle, one of the large circles and the 2 small circles sewn together. We are going to make a little circle sandwich. Felt circle on the bottom, large circle on top of it (right side facing up) and then the 2 small circles sewn together. Pin them in place with the middle of each circle in line. 
 Step 7: Using a ruler and pencil, lightly draw a straight diameter line on the 2 small circles sewn together. 
 Step 8: Sew a straight diameter line all the way through the 2 small circles sewn together. This seam will go through all 3 circles of your sandwich. 
Step 9: Repeat step 8 two more times for a total of 3 diameter lines through the 2 small circles sewn together. These are going to make the pockets for earrings...can you see it yet! This will make 4 small pockets and 2 large pockets. You could do a 4th diameter line and make 8 small pocket if you want, but I like to have 2 different sizes. You will see why later. 
 Step 10: Place the other large circle (right sides together) over the top of the large circle you just sewed the 2 smaller circles on to. The 2 small circles sewn together will be in the middle at this point. Stitch all the way around the outside just like you did with the 2 small circles. Make sure to leave a small gap to turn them right side out. Remember that small grey felt circle, once you have turned the big circles right sides out that grey felt circle will be in between the 2 large circles. I will be kind of like some extra padding for your pretty things! 
 Step 11: OK, this next part was the hardest. Making a way to gather and tie closed the pouch. I used a strip of the pink fabric to make a tunnel (I'm sure there is a sewing word for this but I do not know it) sewing each edge of the pink strip to the blue. 
 Can you see the stitching on the edges in the picture below? 
Step 12: Use a safety pin attached to the end of a ribbon or string that you are going to use to tie close you pouch. I am looking for a better rope, bur for now I am just using a piece of ribbon. Thread all the way around the tunnel and leave about 3 inches on each side to pull and tie. 
Now you are ready to get some jewelry ready. The smaller inside pockets (made by the 2 small circles sewn together) are perfect for stud earrings or smaller rings. See my pearls in there?
 I left 2 of the pockets bigger on purpose for my bigger earrings...
 And I added this little strip after the fact to attach my necklaces to so they wont get all tangled. Hang them around the strip and let them dangle down into the other big pocket. 
 There will still be room for bigger items in the bottom, I put a bracelet and a bigger pendent necklace in the bottom, not in a pocket or anything. Now pull on the ribbon and gather the edges of the pouch. 
Wrap the ribbon a few times around to make sure nothing sneaks out the top, tie a little bow, and toss it in your bag! You are all ready to travel with your new jewelry travel pouch!

Saturday, May 19, 2012

Adventures in Sewing: Kate Mae Dress

A little over a week ago one of my best friends gave birth to her first baby girl - Kate Mae! I have not gotten to meet her (yet!) since they recently moved to Texas, but I wanted to send her a little something from her Auntie V. Sorry I didn't take pictures of the process, but these little dresses are super simple...
 I basically just added a skirt to a onesie. 
This skirt has 2 layers, and a cute little flower...
 And bias tape to finish the bottom of the lace layer.
 I can't wait to meet little Kate - and dress her up in this cute little dress! 

Wednesday, April 11, 2012

Adventures in Sewing: Spring Purse

Sometimes when I am at a fabric store, I stumble upon fabric that I just need to buy. 
I don't have a project in mind for it.
I just need to take a yard of it home with me!
So I get a yard,
take it home,
look at it for a few days,
and then pack it away in my fabric tub...
which is very full right now!
Just before our vacation I was doing some organizing and re-discovered this beautiful, spring floral fabric in my stash. 
So I decided to whip up a quick little purse to use on vacation. 
I didn't do the best at taking step by step pictures,
and I didn't use a pattern,
but here it basically what I did...
Step 1: Fold fabric in half and cut out 4 "U" shapes, all the same size. Place 2 of the "U" shapes pretty sides together and sew a seam along the curved sides and bottom, leaving the straight top side open. Repeat with other 2 "U" shapes. You will end up with 2 large pockets.


Step 2: Leave one pocket with the pretty sides together and turn the other so the pretty sides are showing. Fit the "pretty sides showing" pocket inside the "pretty sides together" pocket. Match up the side seams and pin the straight top sides together all the way around the opening.  


Step 3: Get your straps ready. I just made mine with scraps of the same fabric. 


Step 4: You will need to put the straps in between the 2 pretty side of fabric on each side of the purse. 
I also added a few pleats to the top of the purse as I was pinning the straps in place. 
Step 5: Sew almost all the way around the top of the purse, make sure you leave about 2 inches of the seam open to pull the fabric through. 
Step 6: Pull fabric to make the purse right sides out. 


Step 7: Stitch the opening closed. 
Step 8: Make some kind of closure for the purse. Button, magnet, zipper...whatever you want to do to keep this little purse closed. I used a zipper...and I actually sewed in on by hand. I had one that was the prefect size. (I also randomly pick up zippers in a variety of colors and sizes...I know, I'm weird!) 


I used this little purse every day of my vacation! 
(on Granada)

(on the boat)
(in Puerto Rico)

Do you have a new, favorite item for spring?