Image Map
Showing posts with label DIY. Show all posts

Wednesday, October 2, 2013

Adventures in DIY: Tip #5


Tip #5 ~ Find the things that are most helpful in the DIY home improvement process, and do them. 
Sometimes things that seem like little ways to help, are actually the biggest help. 

We enjoy working on our DIY projects together, however I have to admit that most of the construction related DIY skills belong to Daniel. There are many evenings when Daniel and I are working in the basement and I feel like I am spending all of my time getting things for him, while he does all the real "work". And often I would feel discouraged that I was not helping enough, or annoyed that he was always asking me to find this tool or wash that tool. It wasn't until just recently that I realized how much my running all over the house was actually helping him get more work done faster. He wasn't having to stop every 3 minutes to get something or move a ladder to the next location. Find the thing that is most helpful and do it, even if you don't feel like you are helping much. 


Did you miss one of the first 4 DIY home improvement tips?

Tip 1 ~ Tip 2 ~ Tip 3 ~ Tip 4

Monday, September 9, 2013

Adventures in DIY: Tips #4


Are you ready for tip #4?!


(This one is an ongoing struggle for me...)

Tip #4) For any home improvement project, always remember It will be dirty. You most likly won't be able to keep up with the dirt and that's O.K. Like I said this is an ongoing struggle for me as we have been finishing our basement. Every time I clean the upstairs, the house is dirty again with in days. Much quicker than normal. 

As we have been going along we have tried to keep the dirt...

And now the dust.. 


down in the basement.
But it just doesn't work that way! At first the extra dirt/dust/overall filth really stressed
me out. No matter how hard I tired, I could not keep up with it, especially when you add in time spend working in the basement, there were just not enough hours in the day. And then I realized that this is just the way DIY home improvement projects are! Our house is under construction, and it's going to be dirty. So just live with it, give yourself a pass on having a spotless kitchen floor, and enjoy the process of investing sweat equity into your home. Being stressed about having a clean house is just not worth it. 


Did you miss the previous tips for surviving a DIY Home Improvement Project?

Thursday, September 5, 2013

Adventures in DIY: Tip #3

OK, get ready for another tip for surviving a DIY home project!
Tip #3 just so happens to go along with Jenni's "Blogtember" theme for the day:
Thursday, September 5: Pass on some useful advice or information you learned and always remembered. 


So here we go....
Tip #3 to survive a DIY home improvement project is a lesson I will always remember...

 If your husband tells you to "pick out what you like", make sure you look at the price before you show him what you like.

I learned this one the hard way on a previous DIY home project!

 When we were installing a tile back splash in our kitchen, my wonderful husband took me to the tile store and told me to pick out what I liked for the back splash....so I did. 


And let's just say, I have expensive taste when it comes to tile! I had no idea how much the tile cost, I just did what he told me to and picked out what I liked. We love our back splash, but I still get teased about my expensive taste in tile. 

Most DIY home improvement projects have some kind of budget and the majority of that budget goes to supplies. We have learned to watch for sales on the items that we will be needing for a project, and to shop around for the look we want at the right price for our project. 

Did you miss the first 2 tips for surviving a home DIY project?


Wednesday, August 28, 2013

Adventures in DIY: Tip #2


Ready for another tip for surviving a DIY Home Improvement Project?
(If you missed Tip #1, click here!)

Tip #2
Avoid ever saying the phrases "I don't care" or "Just do whatever". 

This one is just as much a reminder for me as it is a tip for you...

For anyone who has ever attempted a DIY home improvement project you know there are a million little decisions that will need to be made along the way. 

We have them every day on our basement project.
For example here are some decisions that needed to be made about lights....
What kind of light switch do you want?
How high do you want the light switch?
Do you want 2 lights or 1 light above the sink in the bathroom?
What kind of light bulbs do you like?
Where should the can lights be located in the ceiling?

Maybe you really don't care, or maybe you do care but you're overwhelmed by all the decisions... it's better to take time to think about it now, than to be bothered by how something you "didn't care" about turned out in the end.

I have to admit that I'm guilty of saying "I don't care" sometimes when Daniel asks me my opinion on something basement related. I do not always know what's the best decisions, but if he feels the need to ask my opinion, I try my hardest to give him my honest opinion, and not just leave all the little decisions up to him. 

Monday, August 19, 2013

Adventures in DIY: Tip #1

The other day I heard a news story on the radio that said 12% of couples who attempt an home DIY project contemplate divorce during the project. I wish I had written down where the survey came from, but I was in to much shock from the report to think clearly enough. That is a way higher number that I would ever think - I mean, I know full well the stress that can come with having your house torn apart...and working late into the night after working all day at your regular job can be very taxing on even the strongest of relationships...but WOW! To be so stressed and aggravated that divorce is put on the table...yikes! So I thought I would share some of the lessons and tips we have learned for surviving a *HUGE* DIY home improvement project...

* I shared a condensed version of these tips on Generation Building Center's website last week! 

1) Before you start, 
sit down, 
make a plan together, 
and write it out. 
Making the big decisions together before you start will save you lots of discussions (and possibly money...and disagreements!) once you actually start your DIY home improvement project. Writing a plan down will help you both be able to see the big picture and it will be a good list to follow as you get your DIY hands dirty! 

We did lots of research before we started digging.
We made lots of drawings of how we wanted the end product to look.
There were multiple lists:
supply lists
pro/con lists
what we wanted lists
We even got quotes from several contractors before we decided to DIY.


Like anything in life/marriage, good communication is really really really important. Before the project and during the project. I am blessed to have a husband who is constantly asking me my opinion on how I want things to look in our basement...and at the same time he knows what is realistic and do-able with the space we have.

(He is immune to Pinterest...where as I am NOT and go a little crazy with ideas!!) 

When we have needed to change something on our original "Big Picture Plan", we have spent time together talking, thinking, and praying about the change before we jump in, to make sure we are both in agreement on the change. 

To be completely honest, some things we did not immediately agree on. 
(Shocking, I know!)
But having a plan before we started really helped cut down on the disagreements and conflicts that could have arose! 

Stay tuned for the next tip for surviving a DIY home improvement project! 

Monday, June 18, 2012

Adventures in Home Improvement: Flower Planter

This is what the front of our house looked like almost 3 years ago when we purchased it...
After lots of work
new roof
new stucco
new windows & door
paint
and some landscaping 
There was still one thing missing...
The latest addition to the front of our house is something that I have been wanting for a long time! The other day Daniel came home with the supplies to make a new flower box for under the front windows. The old one was rotting and falling apart, and has been taken down almost since day 1. See the 2 little brown stubs sticking out of the wall just below the window? Those are what the flower box sits on and they have been waiting to do their job for a long time! 
Daniel did the measuring, cutting, gluing, nail gunning...
And I held things for him...
 And I took pictures!
And handed him things too!
Basically he started with 3 long pieces of pine. The were much to long, so he cut about 2 feet off of each piece (to be later used for the ends and insides). The bottom and back boards were glued and nailed at a 90 degree angle, but the front board was cut so it lay more at a 120ish degree angle. He measured and cut the end pieces and nailed it all together. 

 Then he put some support boards inside, dividing the planter into thirds. 
The supports do not go all the way to the top, so once the dirt is in, they will not be visible. 
We painted it (and I forgot to take pictures of that), placed it on the 2 posts sticking out of the house and filled it with dirt and flowers! 
We planted petunias, vinca vine, dahlias, and a dwarf purple cone flower.

(Like how I just left the front door open to run outside and take the picture!) 
The front of the house finally looks complete! 


Linking up with Beneath My Heart's "Best DIY Projects of June" party!

Wednesday, May 23, 2012

Adventures in DIY: More Than A Guest Book

Just incase you missed my guest post on 
Alecia's blog Chicken Scratch 
here is my DIY Wedding idea that I shared with her readers. 
   Since we started our blog after we were married, I did not have a chance to share in real time all the DIY things we did for your wedding. I like projects that are unique, inexpensive, and something that will last. Most wedding I have been to have a guest book where you sign your name and maybe address. Useful when writing thank you notes, but after that I would guess most guest books get put in a box, never to be looked at again. For our wedding I wanted to do something a little more fun and unique. So this is my "more than a guest book" idea. 


   Background information: We got married on a cold December morning. Between our wedding ceremony and reception we wanted to take some pictures, but we did not want to make our guests wait a long and boring wait with nothing to do. So we arranged for a 'hot apple cider cocktail hour' at the reception site and had a table set up with the makings of our guest book. The table included various pens and note card sized paper. Printed on each note card was one of the following sentences:
"Advice from the heart..."
"A memory shared..."
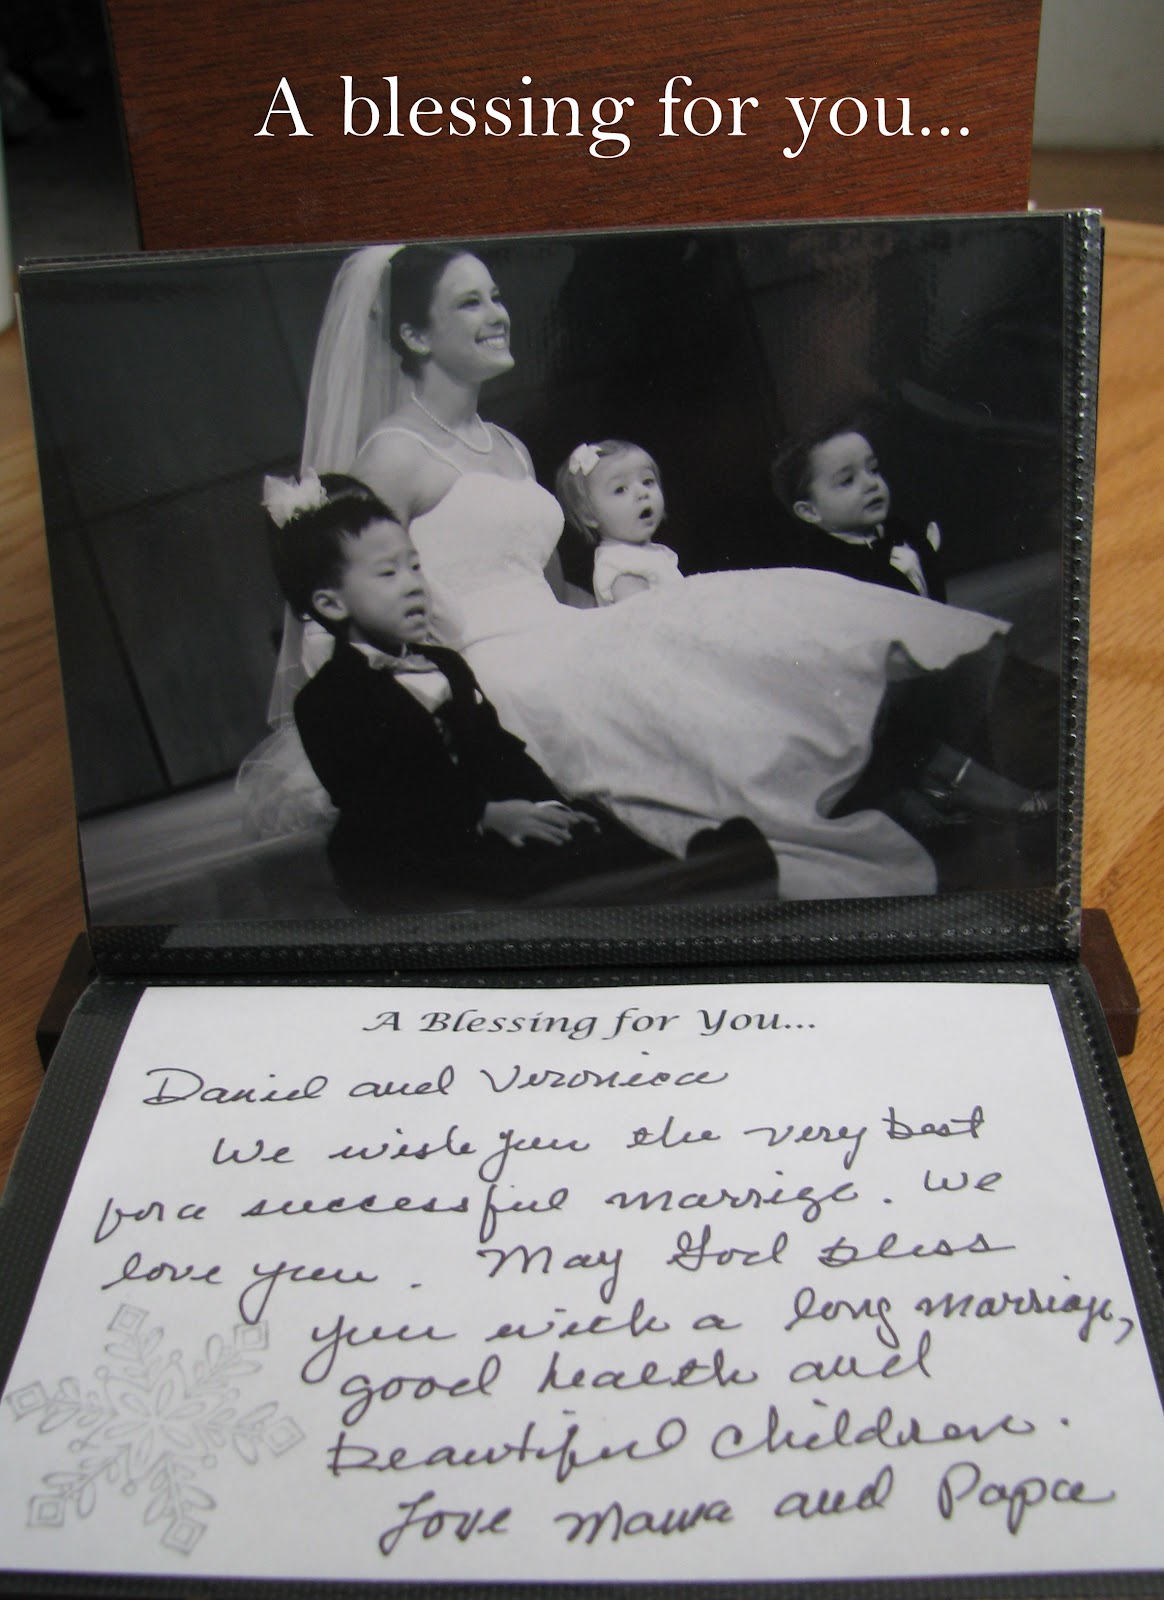
"A blessing to you..."
"You know you're in love when..."
We included some simple directions on a sign, directing our guests to please fill out a card (or more if they wanted) and then place the cards in a small decorative Christmas sleigh that my grandfather had build. While we finished up with pictures, our guests enjoyed recording memories and giving advice to us. After we got back from our honeymoon, we got to read through all the wonderful notes from our family and friends. We received this little box as a gift, and I knew right away it was the perfect spot to store these words of love and wisdom...
 The lid opens up and there are 4 picture sleeves hanging inside!
So I mixed prints we got from friends with our guest book cards...
 A sweet blessing from Daniel's grandparents.
A joke from a friend.
 Great advice from family.
And special memories from everyone!
Not only was it an fun activity for our guests, we now have a great little book filled with these words of wisdom, special memories, and blessings to look back on and remember all of our friends and family who came to help us celebrate the start of our biggest adventure ~ married life!