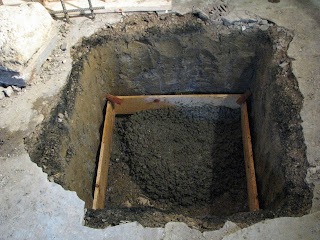
As you may (or may not) remember from {THIS POST} we have our holes dug for the new footers for the new support columns for the basement. We built frames for the new footers out of pine 1X10s and anchored them into the clay with some metal spikes and wood to make sure frame doesn't shift during the pouring process.
Now that the holes are all ready for their concrete footers, we started Step #3 - Mixing and pouring the concrete for the new footers!
(Yes, we have a concrete mixer. It's on a trailer and it is very handy!)
Begin by mixing the powder cement (we used type 1 portland cement), sand, 3/4 inch crushed line stone, and water to make the concrete. We used a 1-2-3 ratio for the concrete. (Leave a comment if you would like to know more about concrete mixing ratios)
Once the concrete is mixed well, dump it into a wheelbarrow and now you need to get it inside. The best way for us was to go through the window...
My job was to shovel the concrete into the shoot and then push it down to the wheelbarrow waiting below. FYI ~ Concrete is HEAVY! I couldn't even push the full wheelbarrow - good thing Daniel is strong!
Daniel made this shoot out of a B-900 water pipe cut in half, and it works perfect!
Shovel into the shoot, and push it down to wheelbarrow #2 waiting below.
Next, dump the concrete into the hole
Repeat until the frame is filled to the top with concrete.
One step that I didn't get a picture of was the rebar lattice that is incased in the concrete.
Rebar is the steal bars that make the concrete stronger - you may have seen them when driving past a road construction project.
Smooth out the concrete


Awesome post Veronica and Daniel. Thanks a lot for sharing this with us. Cheers!
ReplyDeleteWow...that looks like such hot, hard work!!
ReplyDeleteDid you get all of the new footers poured?
Has your power come back on yet?
Sorry....inquiring moms need to know ; )
I know shoveling that concrete was heavy, I was doing the same thing about a month ago when we were doing our backyard B-B-Que and Spa area. Sure builds some muscles or lets you know you don't have any. Mine was the later. Lol
ReplyDeleteSure enjoyed your post.
Wow! Concrete IS heavy! I bet you were sore the next day. Great job! Thanks for sharing those great ideas at the Pomp Party! Pinning to our Pomp Party board!
ReplyDeleteGreat post! :) I learned a lot. Megan
ReplyDeleteThis comment has been removed by a blog administrator.
ReplyDeleteAwesome! It's amazing what you can do with a little nudge and imagination. :) Thanks for this!
ReplyDeleteThis comment has been removed by a blog administrator.
ReplyDelete